Updating block and exclusion lists
When to use this guide: Use this guide when configuring or validating CRM integration behavior.
With OutboundSync, you can have any Salesforce report function as a blocklist or exclusion list, depending on which sales engagement platform you’re using. You also know of these as Do Not Contact (DNC), opt out, or suppression lists.
These lists ensure that cold outreach is not sent to existing customers, competitors, open deals, or contacts on Do Not Contact lists.
Read about the difference between block lists and exclusion lists here.
Creating your report in Salesforce
Section titled “Creating your report in Salesforce”OutboundSync uses Salesforce reports as a source for the block or exclusion list in Salesforce. The benefit of this is that Salesforce’s reporting engine is highly configurable and adaptable.
Understand the API limitations: The Salesforce Reports API returns up to 2,000 detail rows per execute. If a row (for example a contact) has multiple email or domain columns selected, OutboundSync can block each value.
How OutboundSync pulls the report:
- First sync: runs your saved report (filters as defined in Salesforce; format forced to tabular).
- Later syncs (about once per day): applies an API filter on Created Date —
CREATED_DATEgreater than or equal to the last successful fetch. That is the underlying record’s CreatedDate, not “when the row appeared on the report,” and not a custom exclusion-date field.
In practice you can push up to about 2,000 email addresses or domains per pull per report. If the report starts above 2,000 rows, do a one-time CSV export from Salesforce and import it into your sales engagement platform, then connect a report whose result set stays under 2,000 for the initial OutboundSync pull (tighten Salesforce filters, or use a short rolling date window on an exclusion-date field if you have one). If more than 2,000 rows would still appear in a single day, split into multiple smaller reports.
Limitation: an existing contact newly marked Do Not Contact (or similar) keeps an old CreatedDate, so later pulls may miss them. Use the CSV bootstrap for the current historical list, and periodically purge and reload when you need the SEP to match the full current CRM report.
Leads and Contacts need separate reports
Section titled “Leads and Contacts need separate reports”A Salesforce report is built on one object type. You cannot cover Leads and Contacts in a single report for this sync. If open-pipeline (or other) suppression must include both Leads and Contacts, create two reports and two OutboundSync block-list configs, both pointed at the same Instantly (or other SEP) API key. That is separate from splitting reports when you add more than 2,000 rows per day.
If you don’t have a blocklist built yet, let’s create one now. Otherwise, skip ahead.
Need inspiration? Popular examples include Do Not Contact / exclusion lists, channel partners, open opportunities, and active customers.
Build a new report by going to Salesforce > Reports

Recipe: Do Not Contact / exclusion report (Contacts & Accounts)
Section titled “Recipe: Do Not Contact / exclusion report (Contacts & Accounts)”Report type: When the fields you suppress on live on the Contact object (for example Exclude from outreach, Do Not Contact), start from the Contacts & Accounts report type — not Accounts alone. Account-only reports will not expose contact-level exclusion fields.
- Create a Contacts & Accounts report.
- Set the report scope to an org-wide / all-contacts view (not “My contacts”), so every teammate’s exclusions appear.
- Add filters for each exclusion signal you care about (examples: Exclude from outreach equals Yes; Do Not Contact equals true). Use filter logic so they combine with OR (for example
1 OR 2), not AND. - Remove unrelated default filters (such as a narrow Created Date range) unless you intentionally use them to keep the result set under 2,000 rows.
- Include the email column(s) you will block on. For address-level blocking in Smartlead, Instantly, or EmailBison, email alone is enough; you do not need extra account columns for the sync.
- Run the report and note the row count.
If the result is over 2,000 rows:
- Export the current list (email column) and import it once into your sales engagement platform block list. That covers historical exclusions OutboundSync cannot fully pull through the Reports API.
- For the report you connect in OutboundSync, keep the same OR exclusion filters and tighten size — for example add an exclusion-date (or similar) field filtered to a short rolling window — so the initial OutboundSync pull stays under 2,000. That Salesforce-side sizing is separate from OutboundSync’s Created Date incremental filter described above.
- Connect that sized report in OutboundSync (next section) so new exclusions that appear on the report can sync on later pulls. Existing contacts newly flagged may still need a purge and reload if Created Date does not advance.
Leads: If Leads also need the same exclusion rules, build a second Leads report and a second OutboundSync config (see above).
Example: block by website / domain
Section titled “Example: block by website / domain”Now go ahead and set whatever filters and criteria you want in-place for your report.
Here’s an example report that uses the website field in Salesforce:
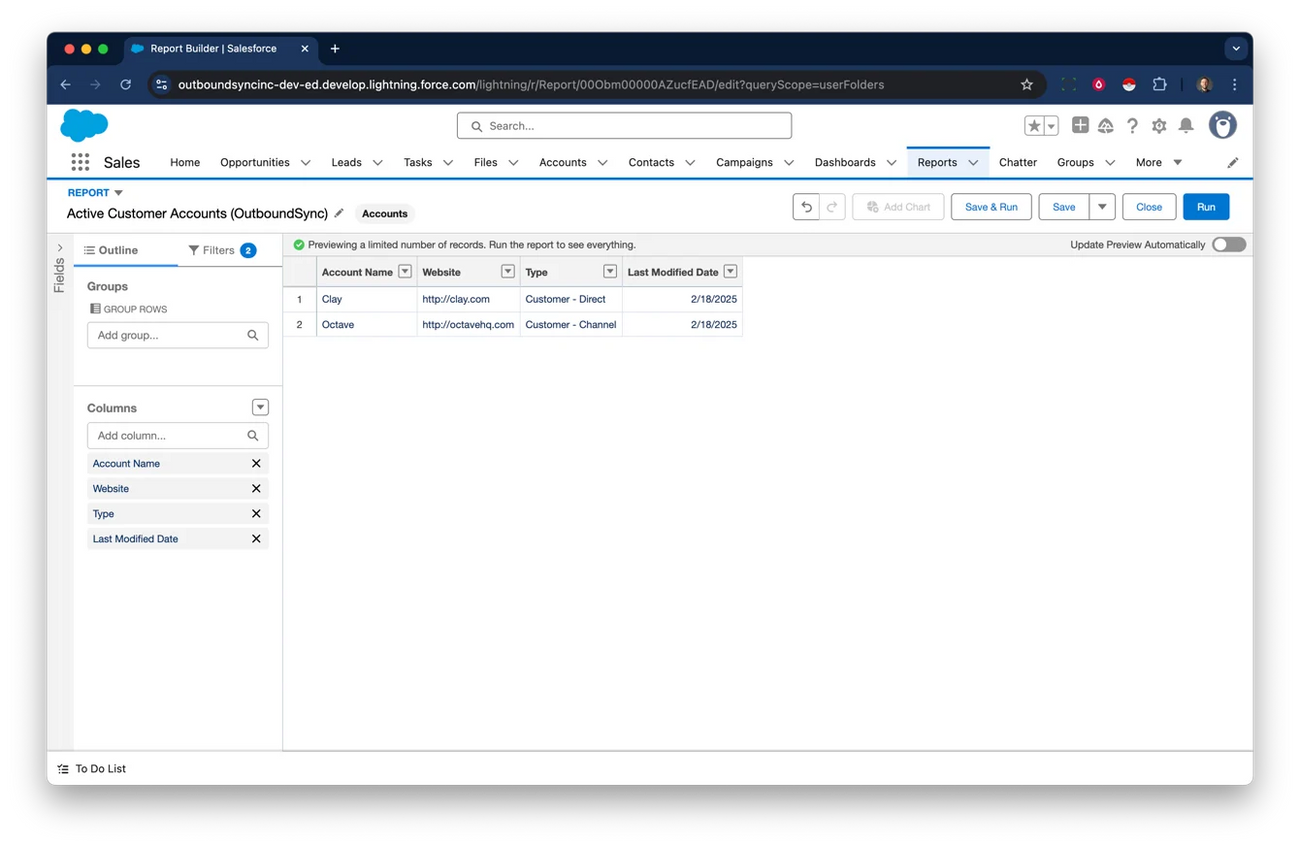
Keep in mind a few things:
- We’ll be creating a list that includes either email addresses or domains as one of the fields.
- In the case of email addresses, we can either do a 1:1 matching block, or we can extract the domain of that email address and block the entire domain.
- If contacts have multiple email fields in Salesforce, include all those email properties in your report and we will use those later.
- Finally, make sure to label your report with a clear name so you can find it quickly.
Pulling your block list into OutboundSync
Section titled “Pulling your block list into OutboundSync”Now that you have created your list in Salesforce, pull it into OutboundSync so new report rows are pushed to your Sales Engagement Platform block list. For this, we’ll need to return to OutboundSync.
What syncs (and what doesn’t)
Section titled “What syncs (and what doesn’t)”Block list sync is additive. New rows that appear on your Salesforce report are pushed to the SEP. Rows that drop off the report are not removed from the SEP automatically. Deleting the sync in OutboundSync also does not clear the SEP — see How sync behaves (additive only) and the purge steps in the Block list maintenance guide.
Remember that the user performing these actions needs to have sufficient permissions. If the user cannot access this data in the CRM, their credential cannot be used by OutboundSync to perform this action.
Navigate to OutboundSync block lists
Section titled “Navigate to OutboundSync block lists”Now, go to the OutboundSync app and go to the Block lists tab on the left.
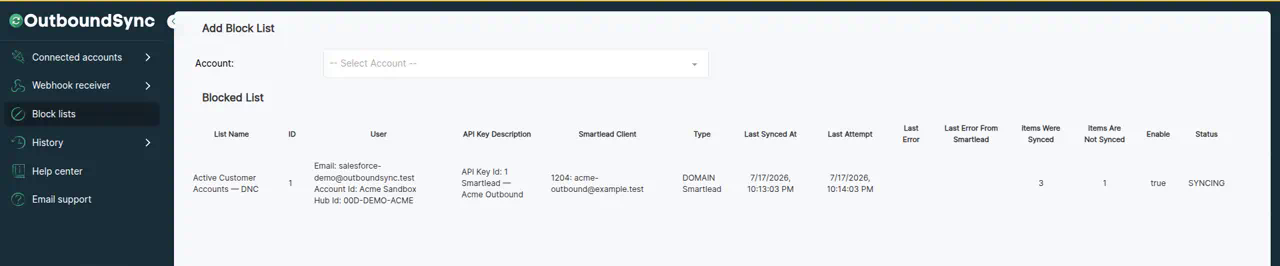
Select your profile
Section titled “Select your profile”Select the Salesforce Connected App that you want to use as the source for your block list. This is based on the user who installed the Connected App when you first set up your OutboundSync account.
Select a list/report
Section titled “Select a list/report”This is the one you just created earlier. If you don’t see it, make sure you have permissions to access to the report in question.
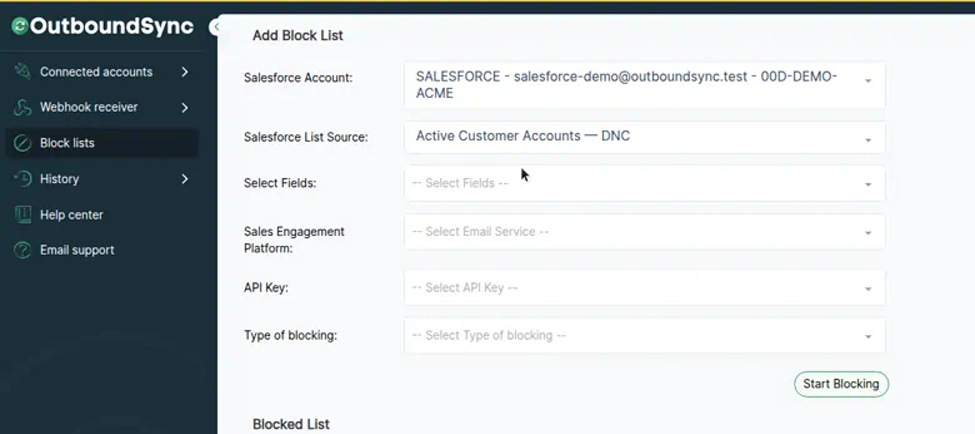
Select fields
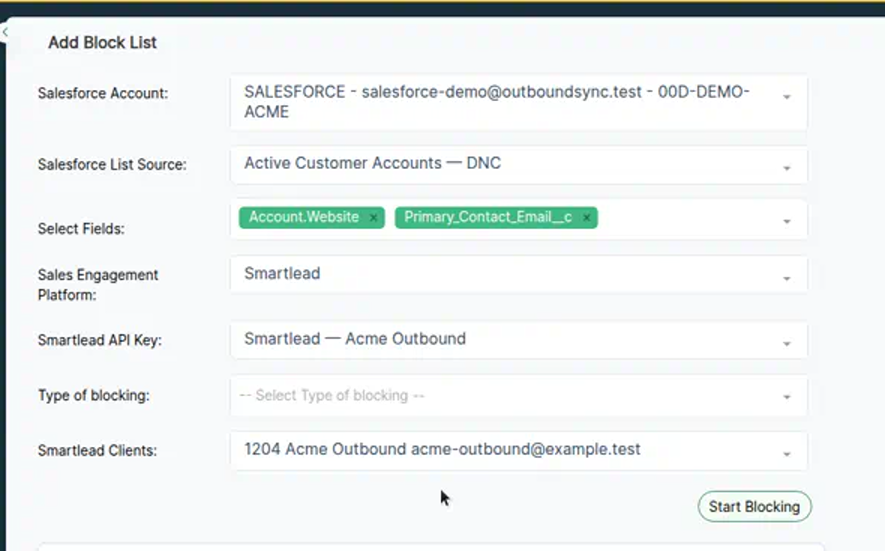
Section titled “Select fields”Select which fields specifically you want to be included in your block list. Remember that the type of field will need to match up with type of blocking you want to do.
Select Sales Engagement Platform API Key
Section titled “Select Sales Engagement Platform API Key”Select the API key for the Sales Engagement Platform that you want to send to the block list. If you want to block this list on multiple platforms, create multiple lists.
Lemlist block lists need a Lemlist API key in Connected Accounts first (category-based filtered sync does not). When Lemlist is selected, choose Email or Social. Email pushes addresses and @-prefixed domains to Lemlist Unsubscribe; Social pushes LinkedIn profile URLs. See Lemlist.
Select type of blocking
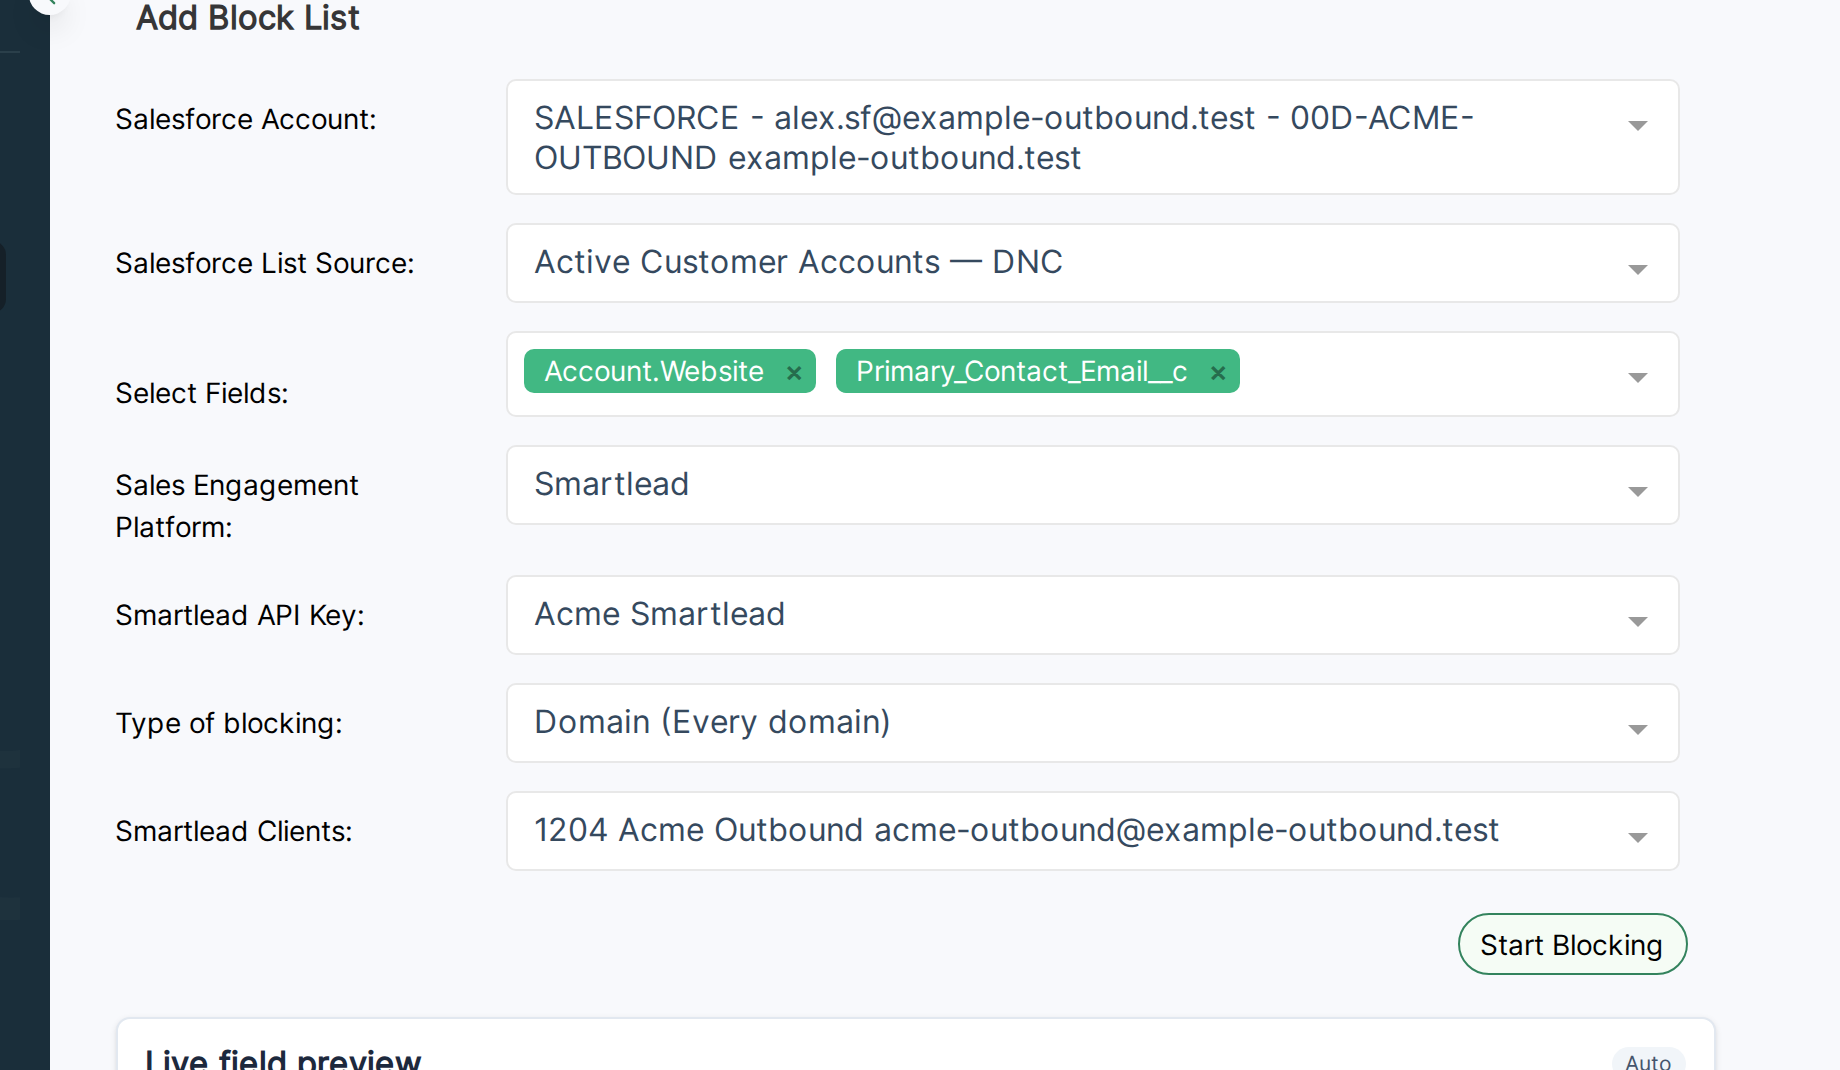
Section titled “Select type of blocking”OutboundSync supports two types of blocking. You can block by address or by domain with the Type of Blocking.
Address (Individual Email Address)
Blocks each email associated with a contact in Salesforce individually and adds it to the blocklist in your Sales Engagement Platform.
Example: Blocking john@example.com doesn’t block all emails ending in @example; only John’s email is blocked.
Domain (Every Email Address)
Blocks all emails associated with a contact’s domain and adds the domain to the blocklist in your Sales Engagement Platform.
If a contact had multiple email addresses, every domain would be blocked.
Exception: Leading email providers (e.g., Gmail, Outlook) won’t be blocked as they are common. View unblockable domains list here. If you want to block these domains manually in your Sales Engagement Platform, download this CSV and import it directly. This would block you from emailing personal email addresses.
Select clients (Optional)
Section titled “Select clients (Optional)”If you are using a Sales Engagement Platform that has specific client IDs like Smartlead, this is the step where you will select that Client ID to match the blocklist to that client. Others use dedicated workspaces where this will not be relevant.
Live field preview
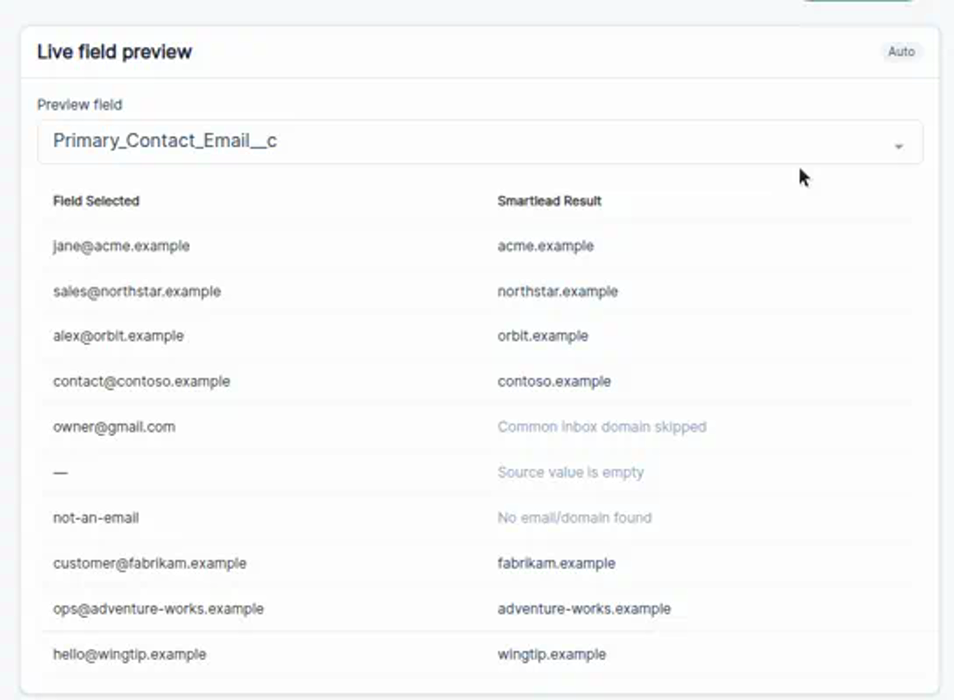
Section titled “Live field preview”Once you select a Salesforce list source, at least one field, a Sales Engagement Platform (Smartlead, Instantly, EmailBison, HeyReach, or Lemlist), and a type of blocking, the Live field preview panel loads under the form. It is marked Auto and refreshes when those choices change.
Use Preview field to choose which of your selected fields to sample. Preview shows one field at a time; OutboundSync still blocks using every field you selected when you start.
The table has two columns: Field Selected (the value from the Salesforce report) and a platform result column such as Smartlead Result. Included rows show the mapped value that would be sent to your platform. Skipped rows show why they will not be blocked — for example, an empty source value, no email or domain found, a common inbox domain skipped, or no profile URL detected.
Preview samples about 10 report rows. It does not require an API key and does not block you from clicking Start Blocking — review the sample, then continue.
Start blocking
Section titled “Start blocking”Next, click Start Blocking (6). You will see your blocklist appear in the table.

This takes time to execute. The larger your list, the more time it can take. Refresh your browser or come back later to see OutboundSync’s progress updating your blocklist.