Salesforce setup guide
When to use this guide: Use this guide when you are onboarding OutboundSync or validating initial setup.
Here is every step required to connect your new OutboundSync account with Salesforce (SFDC) and start syncing data.
If sync or API errors appear after setup, use Troubleshooting and check OutboundSync logs before contacting support. If you disconnected Salesforce and need to reconnect, use Connect or Reconnect on the existing profile — do not Delete and Create a new one. See Re-authorize your Salesforce account. For API volume planning, see How many API calls does OutboundSync use?. Keep the authorizing Salesforce user (or a dedicated integration user) active — see Disconnect CRM after connecting to OutboundSync?.
This guide is broken into five major steps:
- Create client app in Salesforce: Create an external client app in SFDC.
- Connect app in OutboundSync: Connect your app.
- Create a source in OutboundSync: Create a source.
- Verify activity in Salesforce: Check your data synced and enable visibility.
- Connect Sales Engagement Platform: Add your source URL to get data.
This is designed to be self-guided for users creating a test account. However if you are interested in getting help from our team, please contact service@outboundsync.com .
Create your OutboundSync account
Section titled “Create your OutboundSync account”If you do not have an account yet, follow Create your OutboundSync account first. OutboundSync uses passwordless email login at app.outboundsync.com — there is no separate sign-up page, and new accounts are created automatically on first successful login.
If coworkers need to see the same Salesforce-backed sources and logs after you connect, their own sign-up email is not enough on its own — see How teammates get OutboundSync account access. Agencies and consultants setting up a client org should also read Agency and consultant access handoff.
Create client app in Salesforce
Section titled “Create client app in Salesforce”Before beginning, you need System Administrator access (or equivalent) plus permission to create and view External Client Apps. At minimum your profile or permission set should include:
- Create, Edit, and Delete External Client Apps
- View All External Client Apps
- View All External Client Apps, View Their Settings, and Edit Their Policies
If Consumer Key or Consumer Secret stay hidden after setup, see Salesforce Consumer Key and Secret not visible.
- Login to Salesforce.
- Navigate to Setup: Click the gear icon in the top right corner, then click Setup.
- Open App Manager: In Quick Find, search for App Manager (under Platform Tools → Apps), or search for External Client App Manager.
If you do not see App Manager or External Client App Manager, contact your Salesforce Admin and confirm the External Client App permissions above.
If OutboundSync already exists in App Manager
Section titled “If OutboundSync already exists in App Manager”Some orgs set up OutboundSync before Salesforce introduced External Client Apps and already have a Connected App named OutboundSync. You do not need to create a new app if one exists.
- In App Manager, find OutboundSync in the list.
- Open the dropdown on the right and select View.
- Click Manage Consumer Key and Secret (you may need to verify your identity).
- Copy the Consumer Key and Consumer Secret for the next step.
If you cannot view the Consumer Key or Consumer Secret, see Salesforce Consumer Key and Secret not visible.
Create a new External Client App
Section titled “Create a new External Client App”-
Select New External Client App.
-
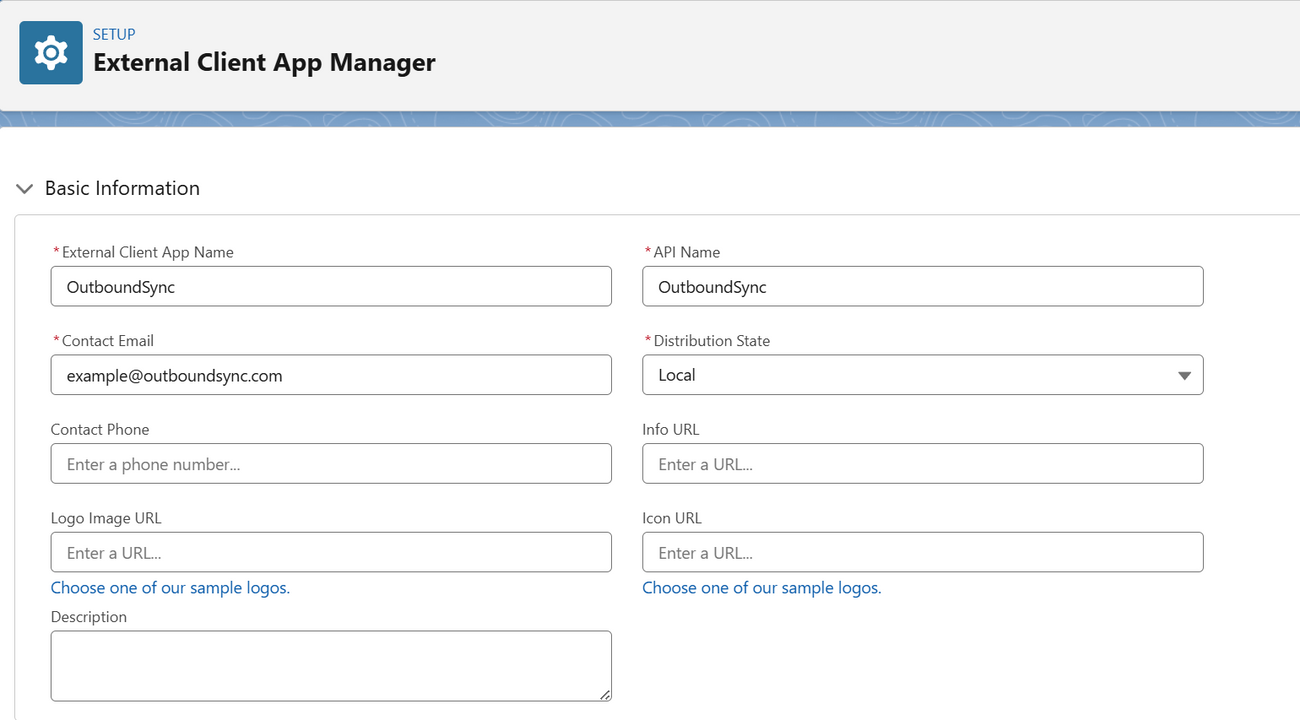
Enter the following Basic Information:
- External Client App Name: OutboundSync
- API Name: OutboundSync
- Contact Email: Your preferred email address
- Distribution State: Local
-
Enter the following API / OAuth information:
-
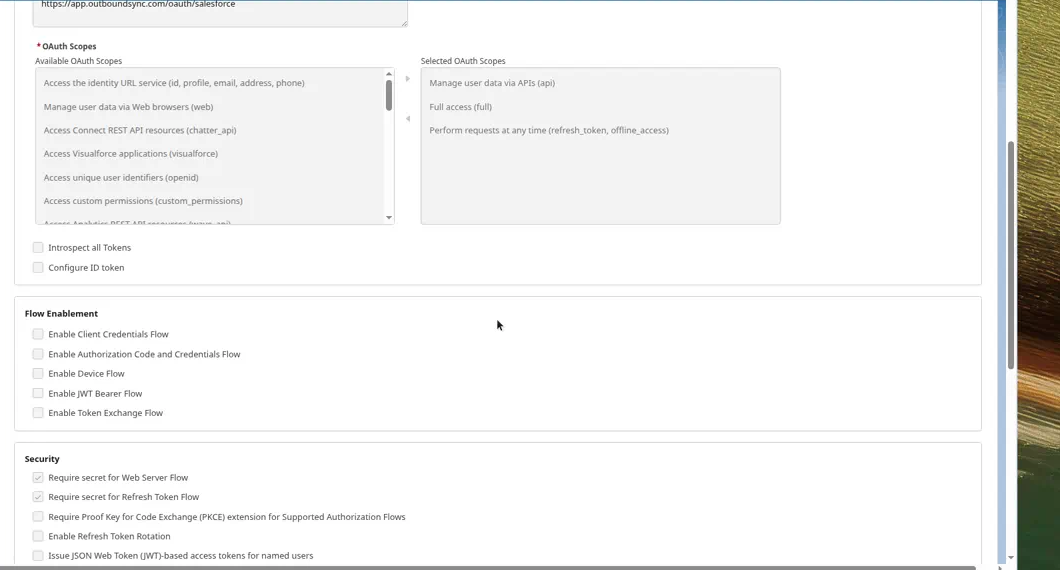
Check the box for Enable OAuth.
-
Enter the following Callback URL: https://app.outboundsync.com/oauth/salesforce
-
Add the following OAuth Scopes:
- Full Access (full)
- Manage user data via APIs (api)
- Perform requests at any time (refresh_token, offline_access)
-
Leave Require Proof Key for Code Exchange (PKCE) Extension for Supported Authorization Flows enabled. Salesforce often checks this by default and greys it out. OutboundSync uses PKCE, so you do not need to uncheck it or contact Salesforce Support.
-
Click Save and then Continue.
-
- Open Settings → OAuth Settings and click Consumer Key and Secret.
- Complete any verification code or 2FA prompt.
- Copy the Consumer Key and Consumer Secret.
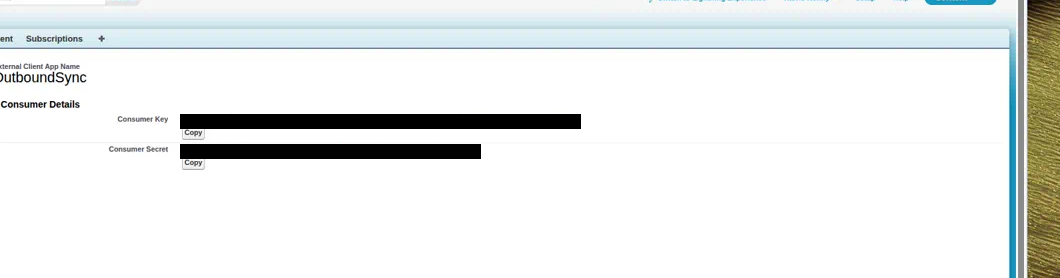
If you are unable to view the Consumer Key or Consumer Secret, see Salesforce Consumer Key and Secret not visible.
Keep this information nearby — you will enter it into OutboundSync next.
Connect app in OutboundSync
Section titled “Connect app in OutboundSync”- Sign in to OutboundSync (or create an account on first login).
- Go to Connected accounts → Salesforce.
- Copy the Consumer Key and Consumer Secret from Salesforce and paste them into their respective fields in OutboundSync.
- Find Your Salesforce Domain: In Salesforce, click your profile image in the top right corner and copy the Domain URL under your name.
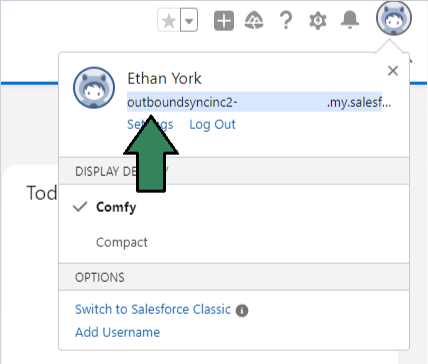
- Enter Domain URL in OutboundSync: Go back to OutboundSync and enter the Domain URL, adding https:// at the beginning.
For example: my.salesforce.com becomes https://my.salesforce.com
- Click Create when you have entered all the criteria.
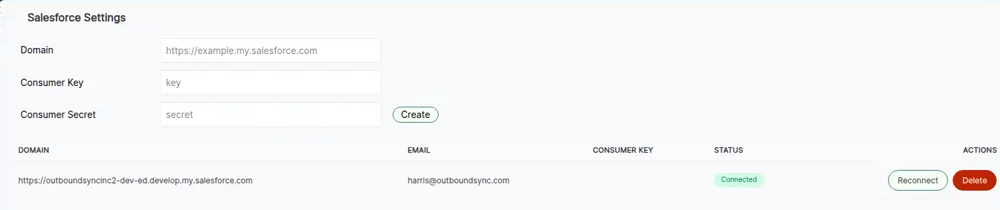
- Log out of any tabs you have open for Salesforce.
- Click Connect on the newly added Salesforce account in OutboundSync. This will prompt you to log in to Salesforce.
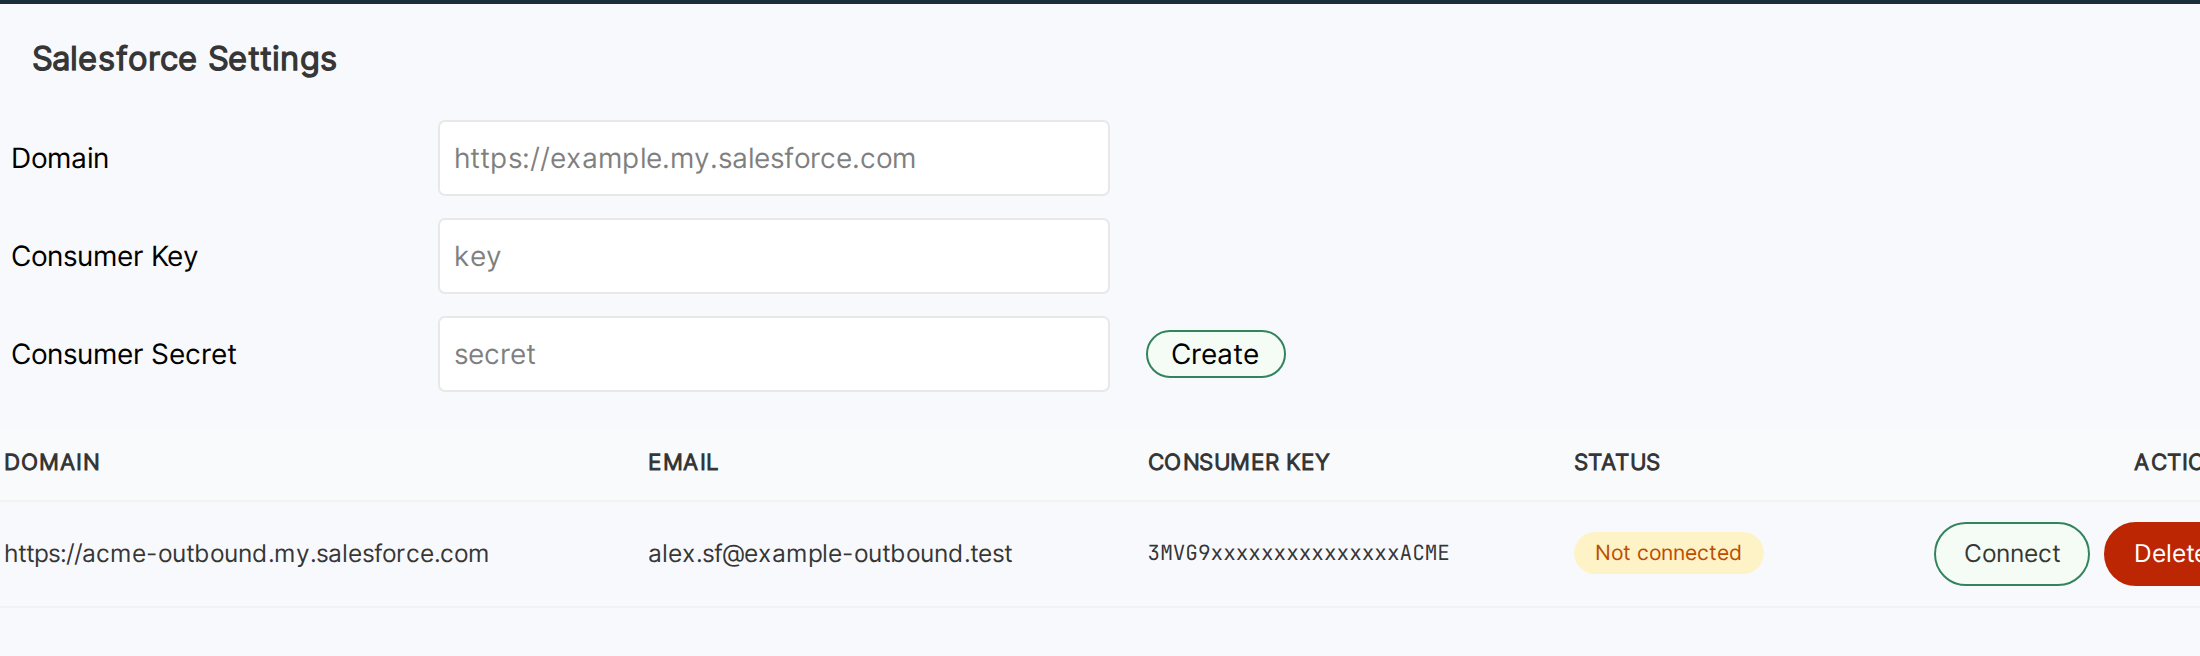
- Select Allow on the list of permissions.
Create alone leaves Status as Not connected. After a successful OAuth redirect, expect a Salesforce account connected success message, Status Connected, the authorized Email filled in, and the action label Reconnect. If Status stays Not connected or the connection fails, fix the email/SSO match below and try Connect again — or see Re-authorize your Salesforce account.
OAuth user must match your OutboundSync login
Section titled “OAuth user must match your OutboundSync login”The Salesforce user who signs in during Connect must be the same user logged into OutboundSync (same email address). Salesforce sets Created By and Last Modified By on synced records from that OAuth user.
Log into Salesforce as that user in the same browser session before clicking Connect. If you are logged into Salesforce as a different user, OAuth will fail or connect the wrong identity.
SSO and integration users: If your org routes Salesforce login through SSO (for example Okta), the integration user must be able to sign into Salesforce through that path. Resetting a password only in Salesforce may not work when SSO manages credentials. If SSO blocks the integration user, reconnect with a human admin user — Created By will reflect whoever completes Connect or Reconnect. See Identifying OutboundSync activity in Salesforce for how Created By differs from webhook owner.
Create a source in OutboundSync
Section titled “Create a source in OutboundSync”Choosing sync scope
Section titled “Choosing sync scope”Before you create the source, decide how much engagement activity should land in Salesforce. This is separate from Upsert or Update Only (whether unmatched prospects become new Leads/Contacts — see below).
- Sync everything. Send every event your sales engagement platform emits (sends, opens, clicks, replies, and related activity). Best when you want full history, omnichannel follow-up, and attribution that includes non-responders.
- FILTERED / category allowlist. Hold activity until a lead hits an allowlisted category (for example interested or positive). Use this when you want tighter CRM hygiene and only qualified leads in Salesforce. Enable FILTERED Approved events plus a Category-based filter allowlist on the source.
Read next:
- How do I decide which data to sync? — full decision, including the atypical replies-only budget path
- How category-based filters work — hold-and-release lifecycle
- Smartlead only: How to fetch lead categories or statuses
Create a Source
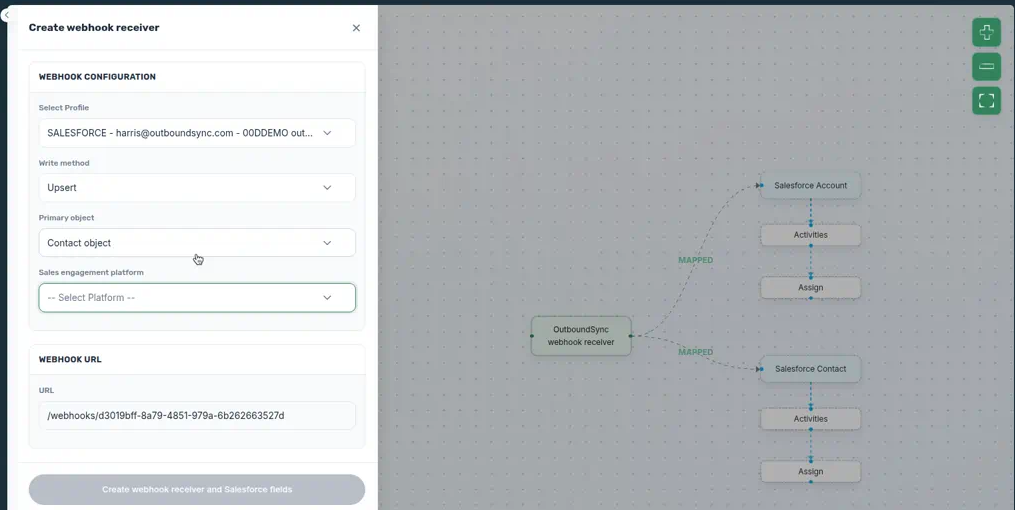
Section titled “Create a Source”In OutboundSync, go to Sources.
-
Select account: Select your Salesforce account from the dropdown.
-
Select owner: The owner is the Salesforce user that newly created Leads, Contacts, Accounts, and Tasks are assigned to by default. This can be a person or an integration user created for OutboundSync. This is separate from Created By, which reflects whoever completed OAuth — see Identifying OutboundSync activity in Salesforce.
-
Custom Fields: Optionally, OutboundSync has the ability to create and write to a group of custom fields with metadata related to your campaigns. You can also select which objects you want to write those fields to (e.g. Contact, Lead, or Task). We highly recommend performing this action with System Administrator-level permissions.
-
Select Email Service. This is your Sales Engagement Platform (e.g. Smartlead, Instantly, EmailBison, Salesforge, or GetSales).
-
Select Salesforce Object. You can log activities as either Tasks or EmailMessages.
- Task Object (Recommended): When writing to the Task Object, you can log data with a user-configurable subject line that can be used for Flows and Reports. While counterintuitive based on the name “tasks”, this is the method that most integrations use in Salesforce in general.
- EmailMessage Object: This object is more intuitively named and for smaller organizations, it may be preferred. Note that when writing to the EmailMessage Object, it has fewer options when it comes to Flows and Reports. However the metadata provided by this object is also more clear to a user and in some cases—especially for
EMAIL_SENTandEMAIL_REPLY- it is more intuitive that these be logged as emails.
-
Upsert or Update Only Salesforce Object: If you select Upsert, it means you want OutboundSync to search for Leads or Accounts/Contacts, and either update them if one is found or create a new one if one is not found. Update Only means that OutboundSync will search and will only update existing Leads or Accounts/Contacts.
If you select Upsert, OutboundSync will try to find Contact or Lead by ID, and then by email as a fallback, and ultimately create a new Lead or Contact if no results are found. If you select Update Only, OutboundSync will only search and update existing Leads or Contacts — it will not create unmatched Leads or Contacts, and it will not create an Account for a matched Contact that has none.
- Forwarding (optional). This is built for Smartlead users due to constraints on the number of permitted webhooks. Register URLs under Connected accounts → Forwarding destinations, then attach them on the source. Read more about forwarding here.
Read more about writing to the Task Object in Salesforce here.
Read more about writing to the EmailMessage Object in Salesforce here.
Enable Task Type field visibility (before Sync Test)
Section titled “Enable Task Type field visibility (before Sync Test)”If you selected the Task object (recommended), make the standard Task Type field visible to your integration user’s profile before you run Sync Test. OutboundSync writes to Type when creating activity. If the field is hidden, Salesforce returns INVALID_FIELD: No such column 'Type' on sobject of type Task and the test fails.
- In Salesforce, go to Setup → Object Manager → Task → Fields & Relationships.
- Open the Type field.
- Click Set Field-Level Security.
- Check Visible for System Administrator (and the profile used by your OAuth / integration user, if different).
- Save.
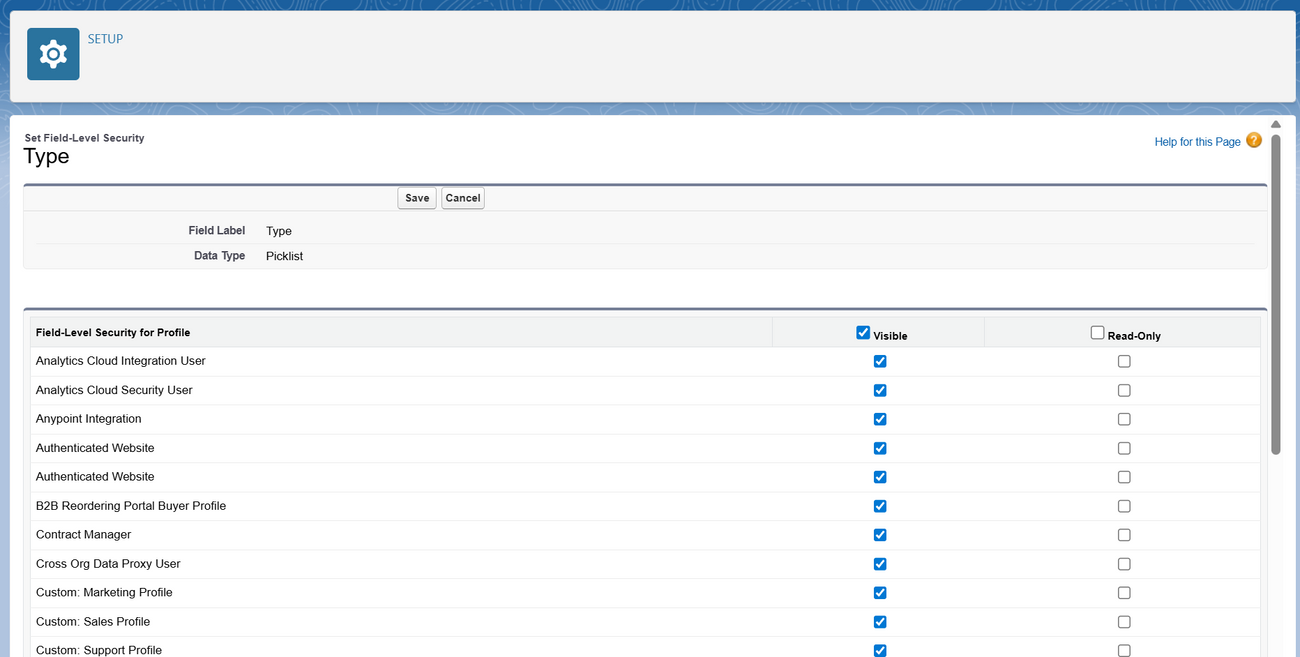
If you see permission-set FLS controls instead of profile checkboxes, or you use the Enhanced Profile UI, follow Fixing the Salesforce task Type field error.
Send a test webhook payload
Section titled “Send a test webhook payload”Click here for a detailed guide on how the Testing Modal works.
We’ll see this in Salesforce later. But while we’re here in OutboundSync, click Sync test to send a test webhook payload over to your Salesforce account.
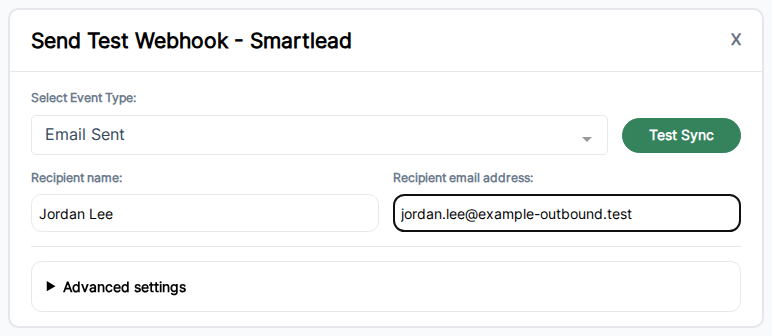
Configure the payload if you want to modify it, or just scroll down and click Test Sync to send it.
If Sync Test fails with transaction was rolled back or another operation in the same transaction failed, see Fixing Salesforce transaction rolled back errors.
If Sync Test fails with INVALID_FIELD / No such column 'Type', complete Enable Task Type field visibility or see Fixing the Salesforce task Type field error.
Verify activity in Salesforce
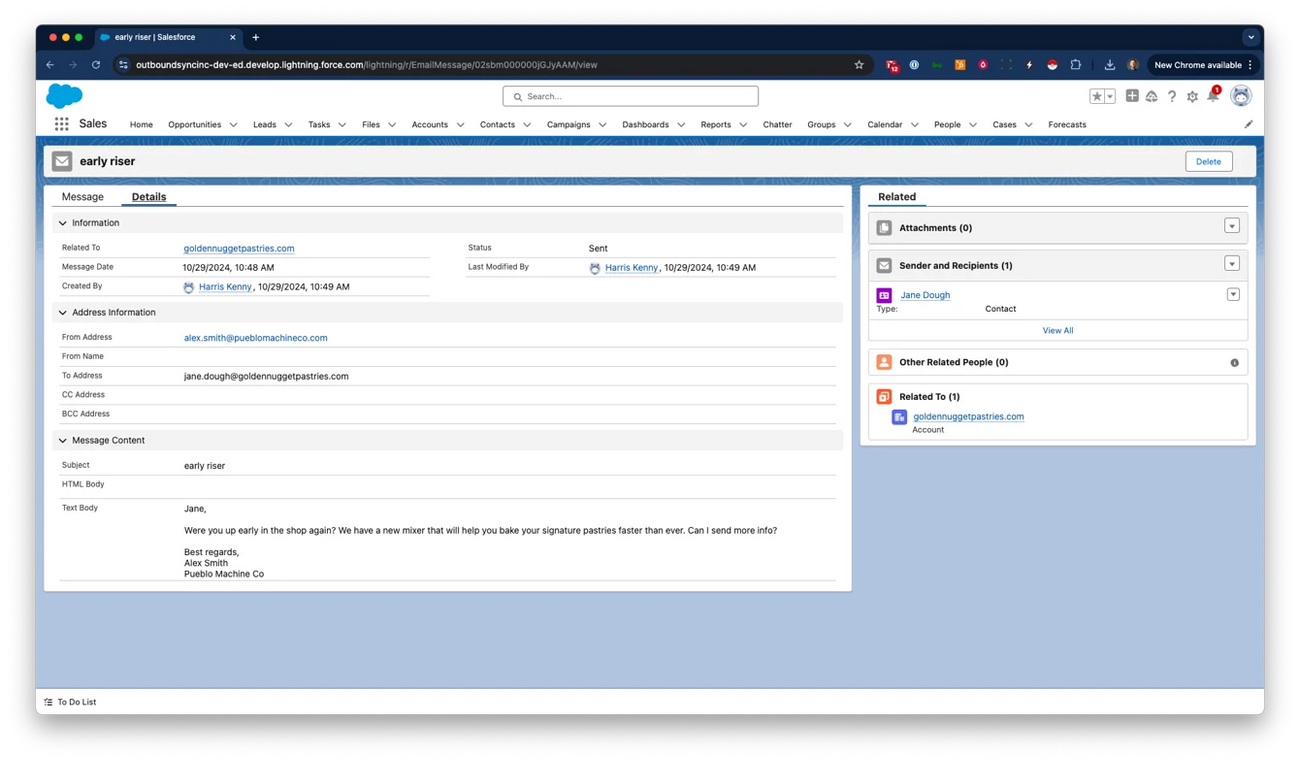
Section titled “Verify activity in Salesforce”First, go to Salesforce and search for the contact used in the test.
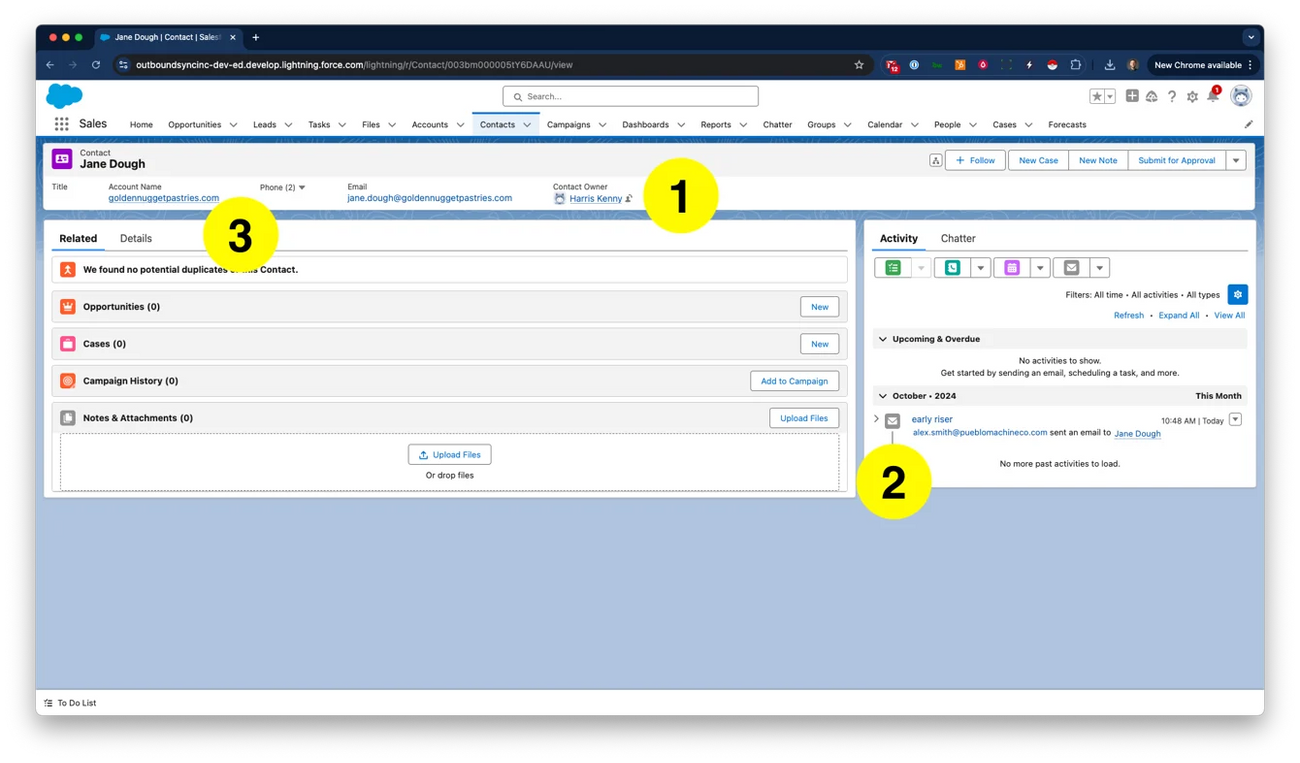
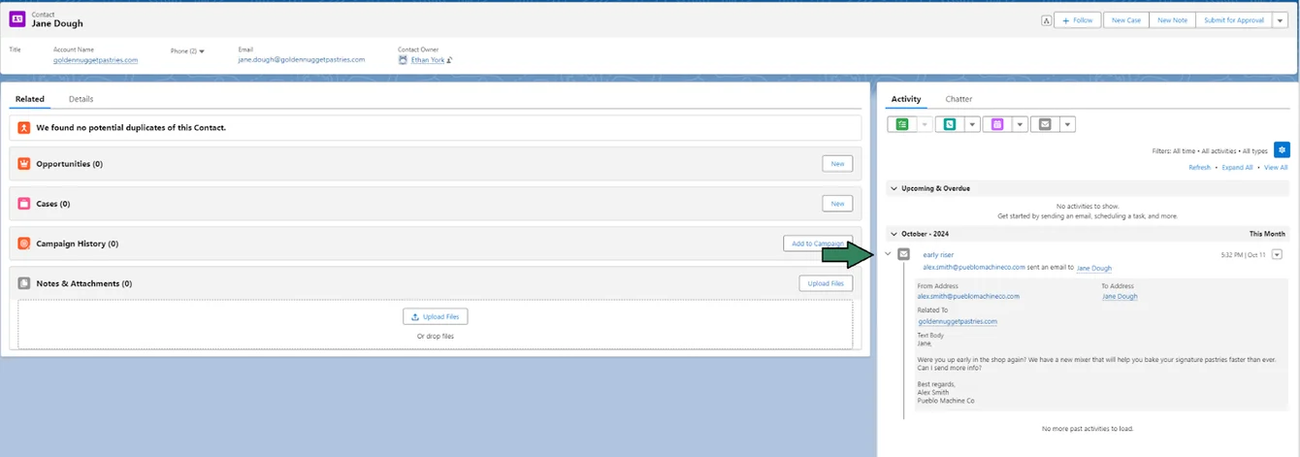
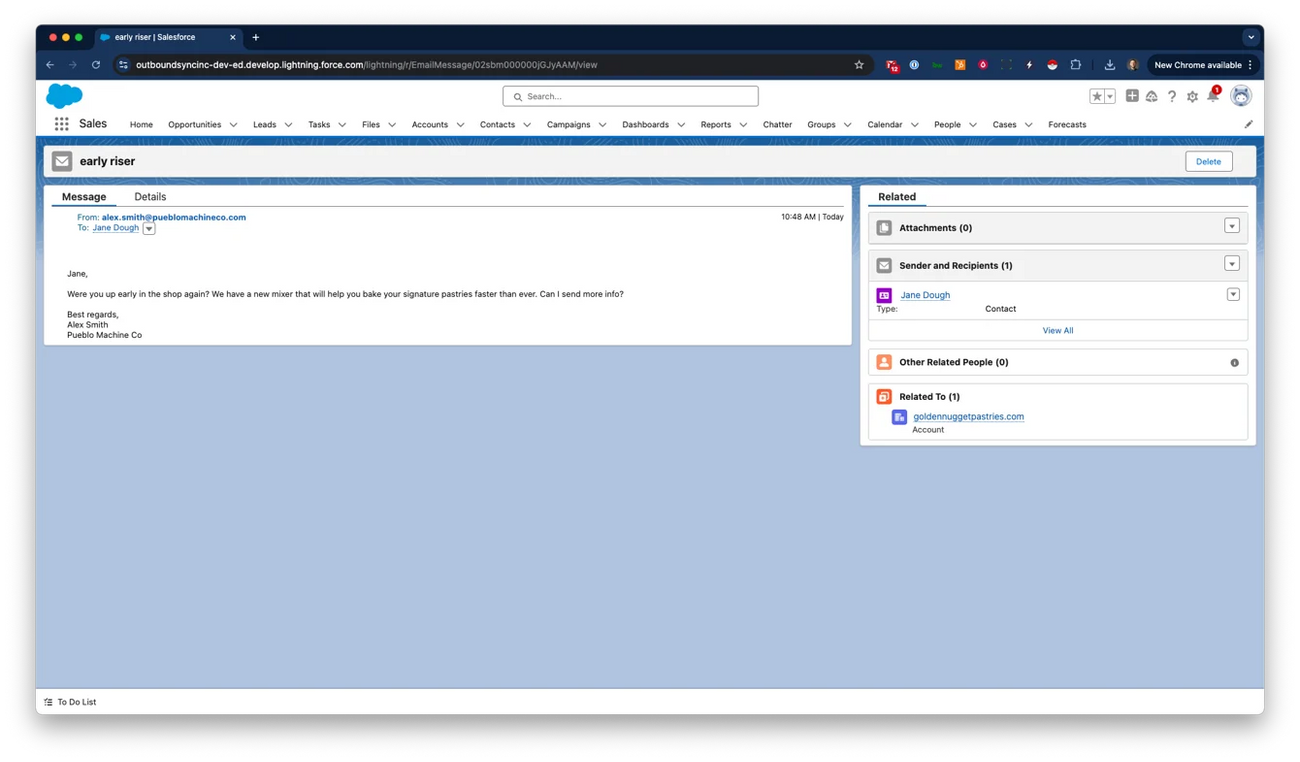
Next, open the contact in Salesforce and view their Activity to ensure everything synced correctly. If no Task appears and Sync Test returned a Type field error, confirm Task Type field-level security first.
Connect Sales Engagement Platform
Section titled “Connect Sales Engagement Platform”To finish the process, add the newly created OutboundSync source URL into your Sales Engagement Platform.
Find instructions on how to do with with the following supported platforms:
Salesforge beta and GetSales beta are also available right now as direct one-way integrations for email and social activity. Dedicated guides are coming later, so use the onboarding steps provided by the OutboundSync team for current setup.
It is vital that you properly add and configure your webhook in your Sales Engagement Platform. If you don’t do this, OutboundSync won’t receive data and your data will not show up in Salesforce.
This guide is the self-serve setup path. For optional guided onboarding on a paid rollout, contact support.
After your first sync
Section titled “After your first sync”Once sources are connected and activity is landing in Salesforce:
- Run a webhook test payload to confirm delivery end to end.
- Identify OutboundSync activity in Salesforce (Created By, Task subject, ownership).
- Build self-serve reports from the Salesforce reporting hub — Tasks plus optional custom fields. There is no packaged Salesforce dashboard today (unlike HubSpot Supered packages).
- Wire CRM-driven block lists when ready — Updating block and exclusion lists.
Next step
Section titled “Next step”Related guides
Section titled “Related guides”- How do I decide which data to sync?
- How category-based filters work
- How to fetch lead categories or statuses
- Agency and consultant access handoff
- Reporting on outbound activity in Salesforce
- Identifying OutboundSync activity in Salesforce
- Which Salesforce fields are updated
- Re-authorize your Salesforce account
- Fixing the Salesforce task Type field error
- Single Page Setup Guide For Outboundsync S Hubspot Integration