HubSpot setup guide
When to use this guide: Use this guide when you are onboarding OutboundSync or validating initial setup.
Here is every step required to connect your new OutboundSync account with HubSpot and start syncing data.
If webhooks or CRM activity look wrong after setup, use Troubleshooting and check OutboundSync logs before contacting support. To understand what happens if the connecting user leaves, or when to uninstall vs re-authorize, see Disconnect CRM after connecting to OutboundSync?.
This guide is broken into three major steps:
- Connect OutboundSync: Connect and configure your account.
- Review in HubSpot: Verify your data synced and enable visibility.
- Connect Sales Engagement Platform: Add your source URL to get data.
This is designed to be self-guided for users creating a test account. However if you are interested in getting help from our team, please contact service@outboundsync.com .
Create your OutboundSync account
Section titled “Create your OutboundSync account”If you do not have an account yet, follow Create your OutboundSync account first. OutboundSync uses passwordless email login at app.outboundsync.com — there is no separate sign-up page, and new accounts are created automatically on first successful login.
If coworkers need to see the same HubSpot-backed sources and logs after you connect, their own sign-up email is not enough on its own — see How teammates get OutboundSync account access. Agencies and consultants setting up a client portal should also read Agency and consultant access handoff.
Initial setup
Section titled “Initial setup”Connect your HubSpot account
Section titled “Connect your HubSpot account”
First, have your administrator sign in to the OutboundSync app (or create an account on first login), where you will connect through your HubSpot account.
Then approve permissions for OutboundSync to be able to access your HubSpot account.
Once you’re logged in, you will see that you don’t have any sources created yet. You must create a source and attach it in your sales engagement platform to start syncing your data.
Determine your routing policy
Section titled “Determine your routing policy”Now that HubSpot is connected, pick how ownership and follow-up should work. Two axes matter:
- How many sources? One shared URL for the account, or a separate source per person.
- Where does routing happen? In HubSpot after sync (workflows), or upstream on the source (each person attaches their own URL in the sales engagement platform).
Assign Contact Owner, Assign Company Owner, and Create Task are optional on either path. Leave them off if you do not care who owns the contact yet, or if HubSpot workflows will set ownership later.
| Team shape | Shared source (route in HubSpot) | Source per person (route by source) |
|---|---|---|
| Solo / one owner path | Works, but usually unnecessary — you rarely need HubSpot workflows just for yourself | Common: one source for you. Turn Assign owners on only if you want ownership set at sync; leave them off if ownership does not matter yet |
| Multi-rep team | Default. One source; HubSpot workflows assign owners and create tasks after sync. Leave Assign owners and Create Task off on the source | Useful when each rep runs full-cycle outbound and attaches their own source URL upstream so ownership is decided before HubSpot |
Most teams use the shared-source / route-in-HubSpot cell. See Routing replies with a workflow for that path.
Choosing sync scope
Section titled “Choosing sync scope”Before you create the source, decide how much engagement activity should land in HubSpot. This is separate from Contact handling (whether unmatched prospects become new contacts — see below).
- Sync everything. Send every event your sales engagement platform emits (sends, opens, clicks, replies, and related activity). Best when you want full history, omnichannel follow-up, and attribution that includes non-responders.
- FILTERED / category allowlist. Hold activity until a lead hits an allowlisted category (for example interested or positive). Use this when you want tighter CRM hygiene and only qualified leads in HubSpot.
Read next:
- How do I decide which data to sync? — full decision, including the atypical replies-only budget path
- How category-based filters work — hold-and-release lifecycle
- Smartlead only: How to fetch lead categories or statuses
Generate and copy your first source URL
Section titled “Generate and copy your first source URL”Under Sources, the next thing you need to do is select which HubSpot account you want this source to be associated with.
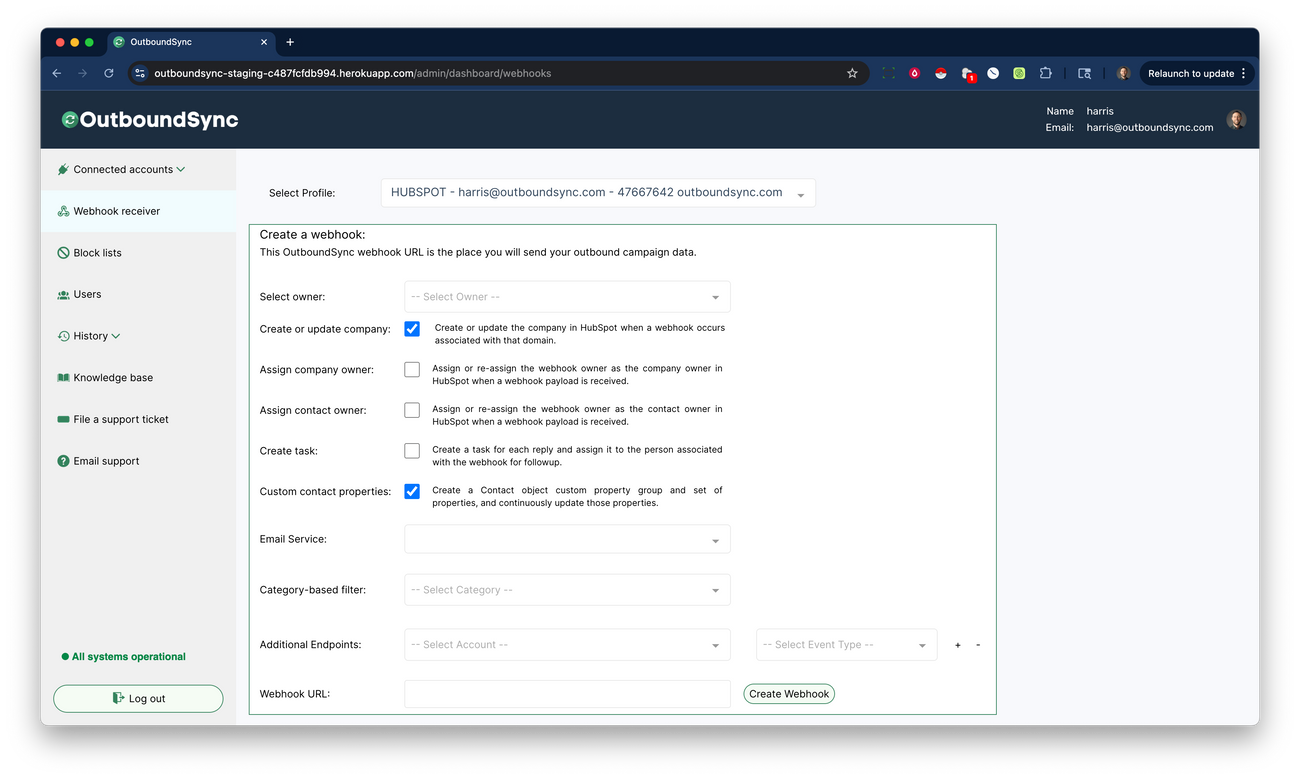
Then, OutboundSync will prompt you to make the following selections. The recommended configuration is set by default.
Select owner: Select the HubSpot user you want to associate the source with. This list will be pulled from your HubSpot account.
Create or update company: Create or update the company in HubSpot when a webhook occurs associated with that domain.
Assign Company Owner: Assign or re-assign the webhook owner as the company owner in HubSpot when a webhook payload is received.
Assign Contact Owner: Assign or re-assign the webhook owner as the contact owner in HubSpot when a webhook payload is received.
Contact handling: Choose whether OutboundSync should create or update HubSpot contacts by default, or use Update Only. With the default create/update behavior, OutboundSync searches for a matching contact and creates a new one if no match is found. With Update Only, OutboundSync updates and logs activity only when a matching HubSpot contact already exists; unmatched prospects are skipped instead of being created.
Use Update Only when HubSpot is your source of truth and you want outbound activity only on contacts your team has already qualified, imported, or approved for CRM tracking. Salesfinity uses dedicated update-only controls, so this general HubSpot contact handling setting does not appear for Salesfinity sources.
Create Task: Create a task for each reply and assign it to the person associated with the webhook for followup.
Custom Contact Properties: Create a Contact object custom property group and set of properties, and continuously update those properties.
Email Service: Select which Sales Engagement Platform you are using for your campaigns (for example Smartlead, Instantly, EmailBison, HeyReach, Salesforge beta, or GetSales beta).
Category-based filter: Optional. When enabled with FILTERED Approved events, OutboundSync holds activity until a lead matches your category allowlist. Disabled by default. See Choosing sync scope above and How category-based filters work.
Forwarding (optional): Forward OutboundSync data on to additional destinations (e.g. Clay, Make, Zapier, n8n). Register URLs under Connected accounts → Forwarding destinations. This is mainly needed for Smartlead users where Smartlead limits the number of webhook endpoints users can add. Disabled by default.
Recommended source settings
Section titled “Recommended source settings”The app defaults match what most teams need. Use this table when you are unsure which toggles to change:
| Setting | Recommendation | Why |
|---|---|---|
| Assign Contact Owner / Assign Company Owner | Leave off for shared / multi-rep sources | The source owner is one static HubSpot user. Multi-rep routing belongs in HubSpot workflows — see Routing replies with a workflow. Solo operators on a personal source may turn these on if they want ownership at sync; leave off if ownership does not matter yet. |
| Create Task | Leave off for shared / multi-rep sources | Same idea — use workflow actions for reply follow-up instead of a static assignee on the source. Optional on a solo personal source. |
| Contact handling (Update Only) | Leave off for cold outbound | With the default create/update behavior, OutboundSync creates a contact when none exists so activity has somewhere to land. Turn on Update Only only when HubSpot is your source of truth (see above). |
| Create or update company | On for typical B2B domain lists; Off when contacts are preloaded with correct company associations, when the same firm uses multiple domains, or on Gmail-heavy lists | OutboundSync associates companies from the contact’s email domain, not a company name from your sales engagement platform. Wrong-domain associations can appear on personal-email lists and on multi-domain firm variants — see Gmail and personal email addresses and Prevent HubSpot duplicates from OutboundSync. |
Social contact lookup (HeyReach and Aimfox)
Section titled “Social contact lookup (HeyReach and Aimfox)”For HeyReach and Aimfox, social profile URL is the default lookup. If HubSpot contacts often lack an enriched profile URL, use Optional Alternative Property so OutboundSync can fall through to email when the SEP lead includes one. For a unique identifier beyond that (for example, HubSpot record ID via os_objectlookup_id on HeyReach), see Lookup method options for social sync and Using custom lead/contact object lookup ID.
Then click Create source.
You can change these settings later by clicking Source Settings after you’ve created your source.
You must click Create source to activate and use your source.
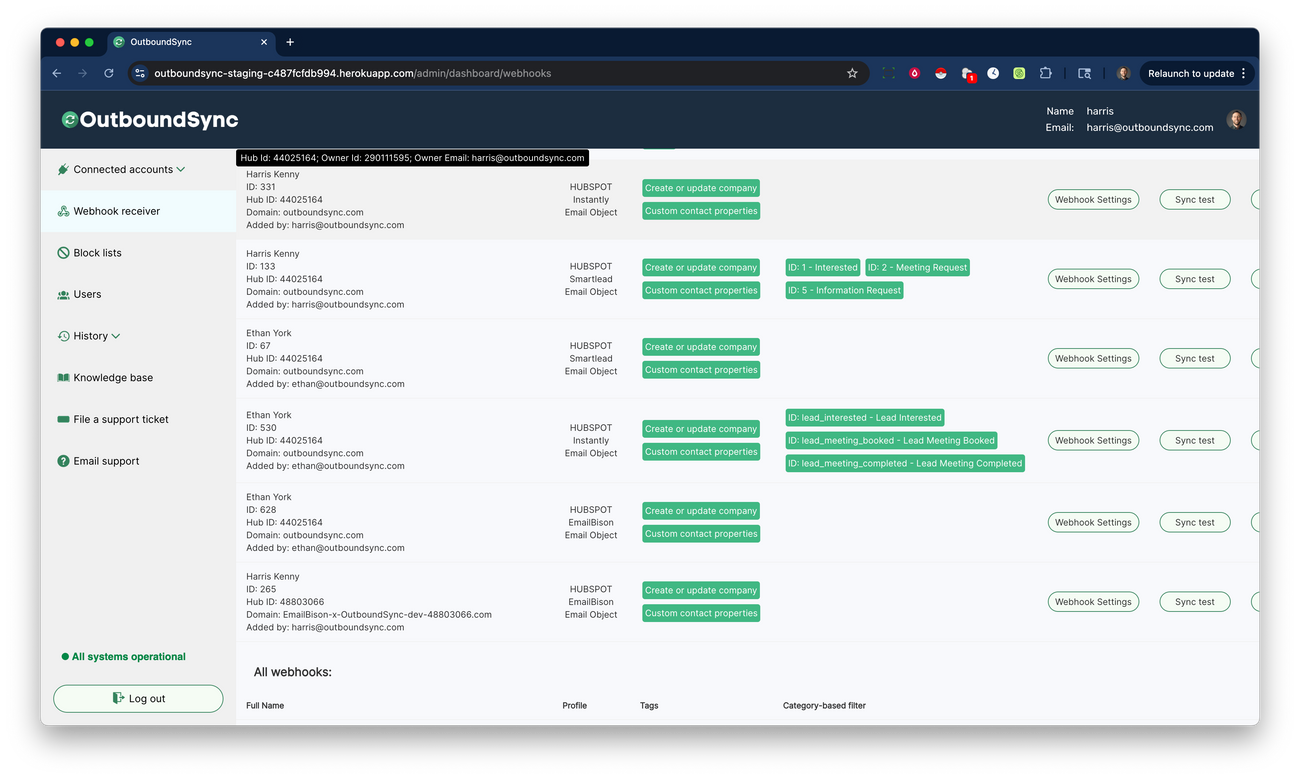
Once the source is created, you will see it on the screen under Existing sources. If you don’t see it there, it has not been created.
Send a test webhook payload
Section titled “Send a test webhook payload”Click here a detailed guide on how the Testing Modal works.
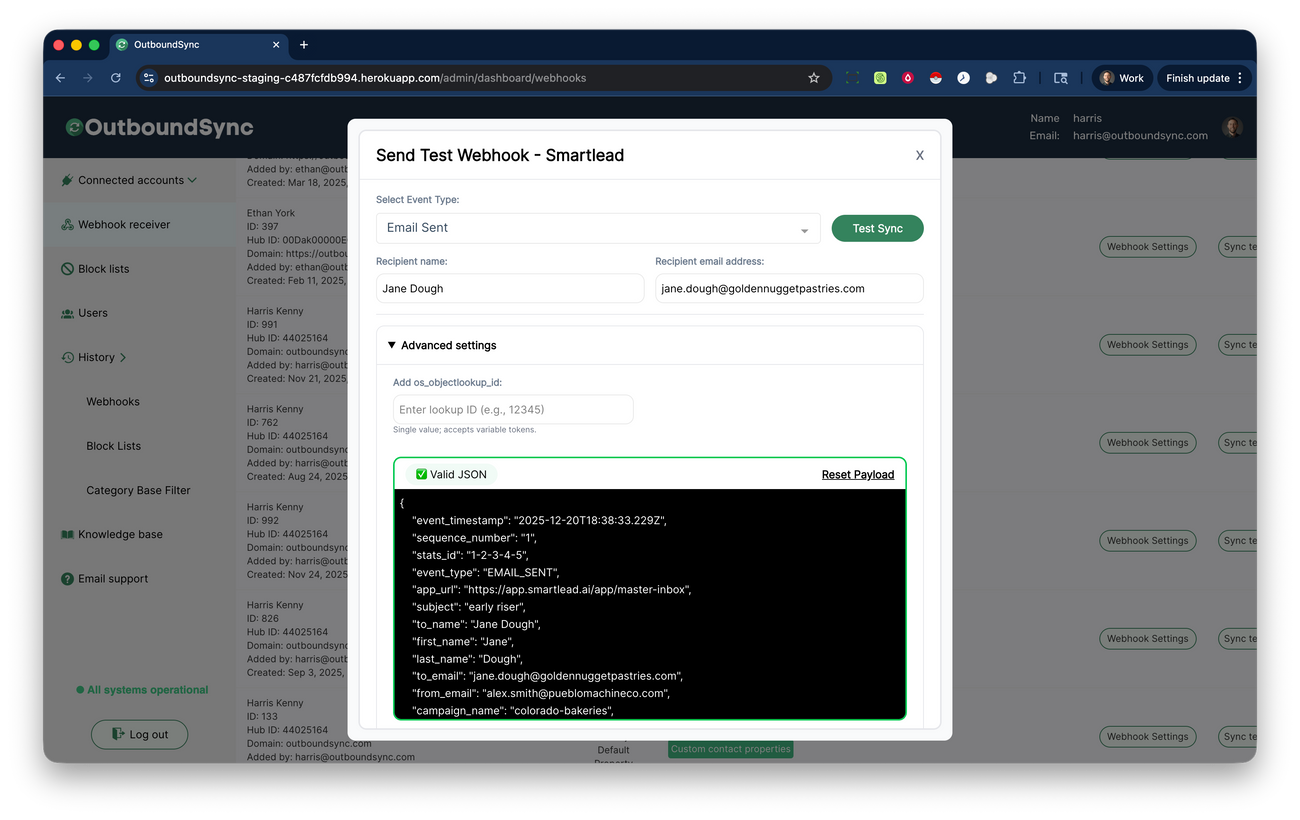
We’ll see this in HubSpot later. But while we’re here in OutboundSync, click Sync test to send a test webhook payload over to your HubSpot account.
Configure the payload if you want to modify it, or just click Test Sync to send it.
Final Steps
Section titled “Final Steps”See synced emails
Section titled “See synced emails”Once you have campaigns in your Sales Engagement Platform, you will start seeing emails logged in your timeline. Note that there may be some processing time before the data is visible in your HubSpot account.
If you have the Create or update company setting enabled, emails will be associated at the Contact- and Company-level. This is possible because OutboundSync handles associations for you automatically. If not, they will only be on the Contact object.
Remember the test webhook we sent earlier? We’re getting back to that now. If you have HubSpot notifications enabled for new records, you may have already received an email about the contact created by the test webhook (and the company, if Create or update company is enabled).
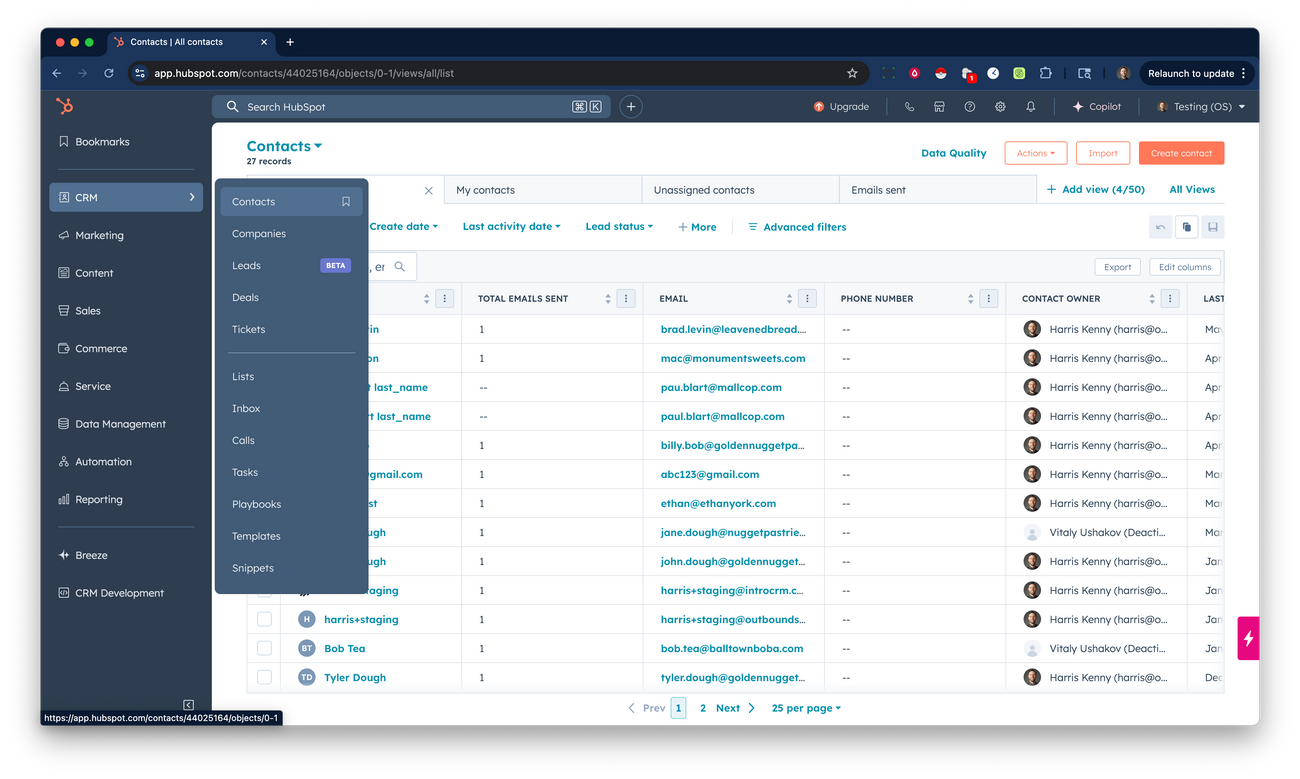
Start with a contact that you know was enrolled in a sequence. Start by going to CRM > Contacts in the side bar menu or simply search for the contact in the search bar. By default, the test contact’s name is Jane Dough.
Then go to the individual contact record for that person.
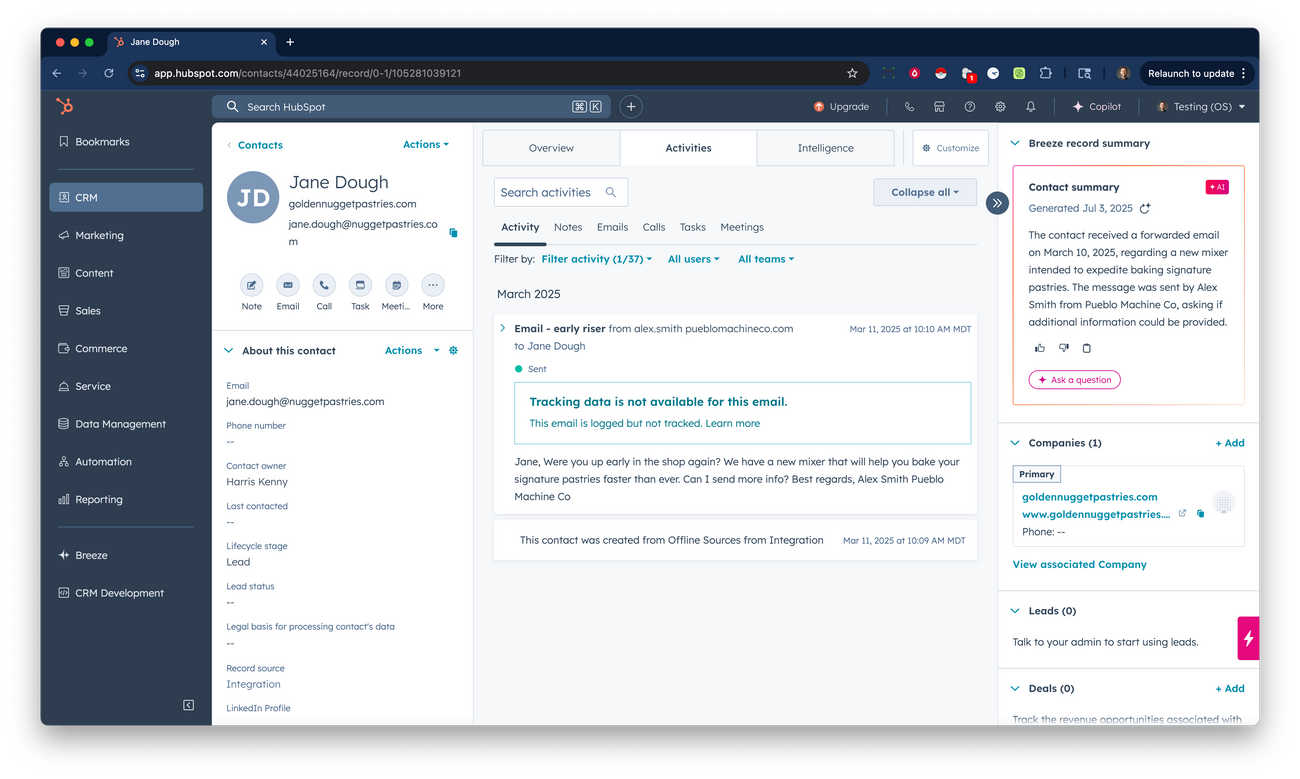
After the test sync, you should see the following on the contact record (depending on which source settings you enabled):
- An OutboundSync timeline event with campaign, step, and message details (visible after you enable Filter activity below).
- A native email activity logged with from and to fields set so you can reply. Replying from that activity sends from the rep’s primary connected inbox, not the sequencer’s secondary sending address — see Where to reply: HubSpot vs your sales engagement platform for when to use HubSpot vs the SEP inbox instead.
- Company association, only if Create or update company is enabled on your source.
- Contact or company owner assignment, only if you turned on Assign Contact Owner or Assign Company Owner — most teams leave these off and route in HubSpot workflows instead.
Next, we will enable the activities filter.
This will pull all the additional data that we’re getting from your Sales Engagement Platform so they’re visible in your HubSpot account.
Enable OutboundSync Filter activity
Section titled “Enable OutboundSync Filter activity”There is currently no portal-level method to set Filter activity in HubSpot. This means each HubSpot user must enable visibility for OutboundSync activities, as shown below, if they want to see them in their timeline.
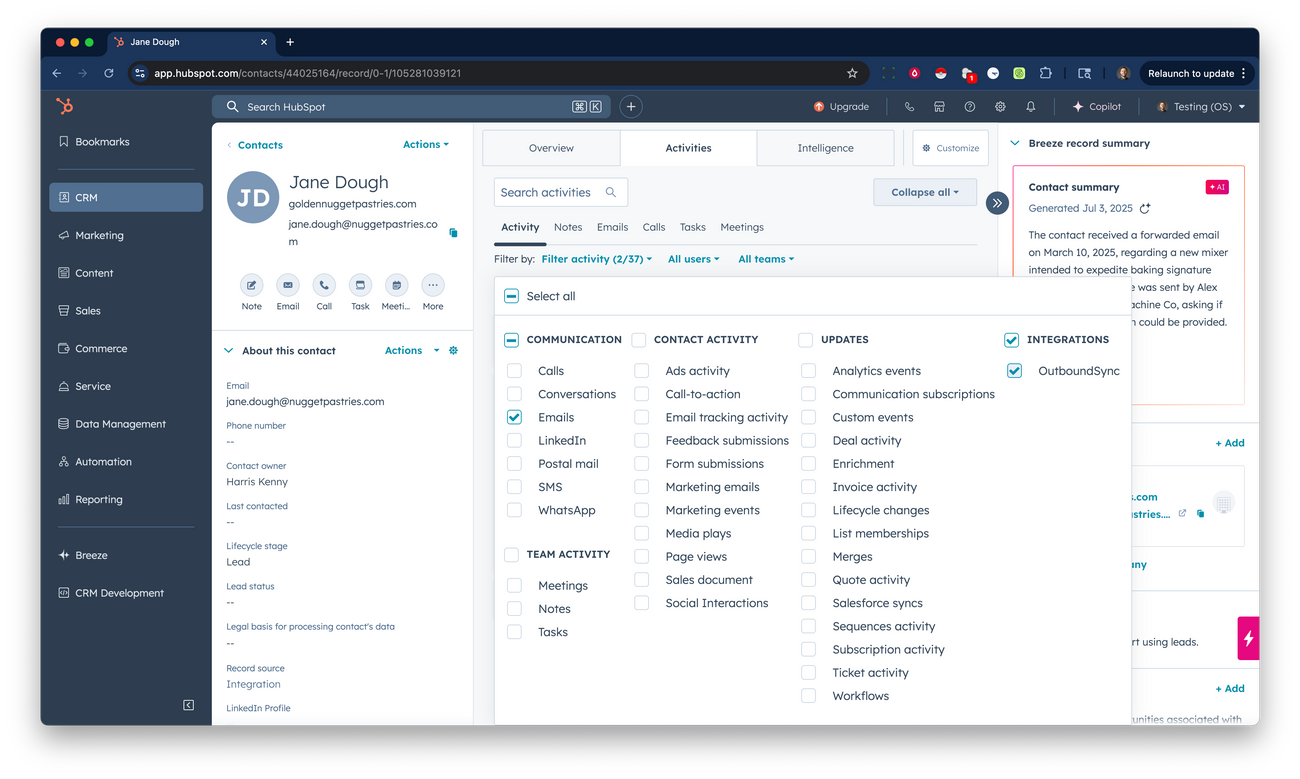
First, go to any individual contact record in your HubSpot portal by going to Contacts > Contacts in the top menu.
Then, go to the Activities tab and click the Filter activity menu.
Make sure that the OutboundSync box is checked under Filter activity when you’re logged in. Go to a contact record, click Filter activity, then check off OutboundSync:
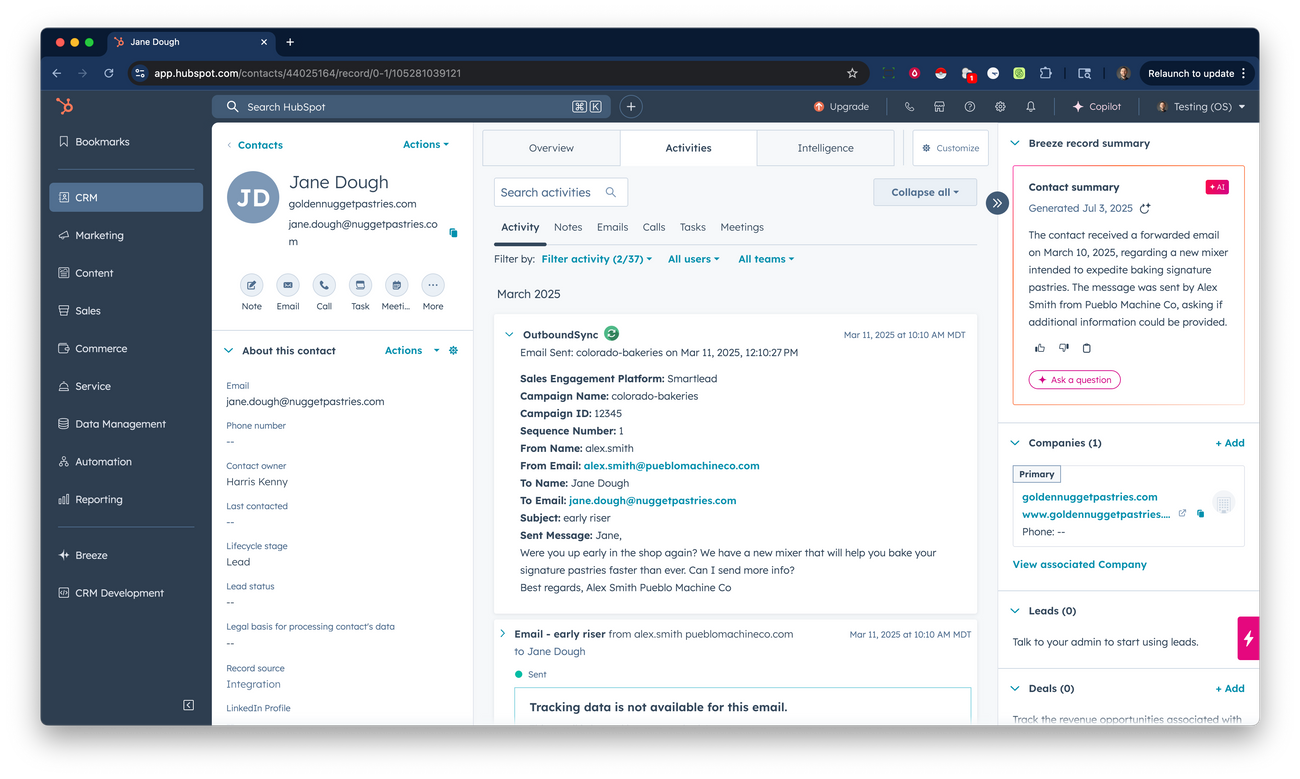
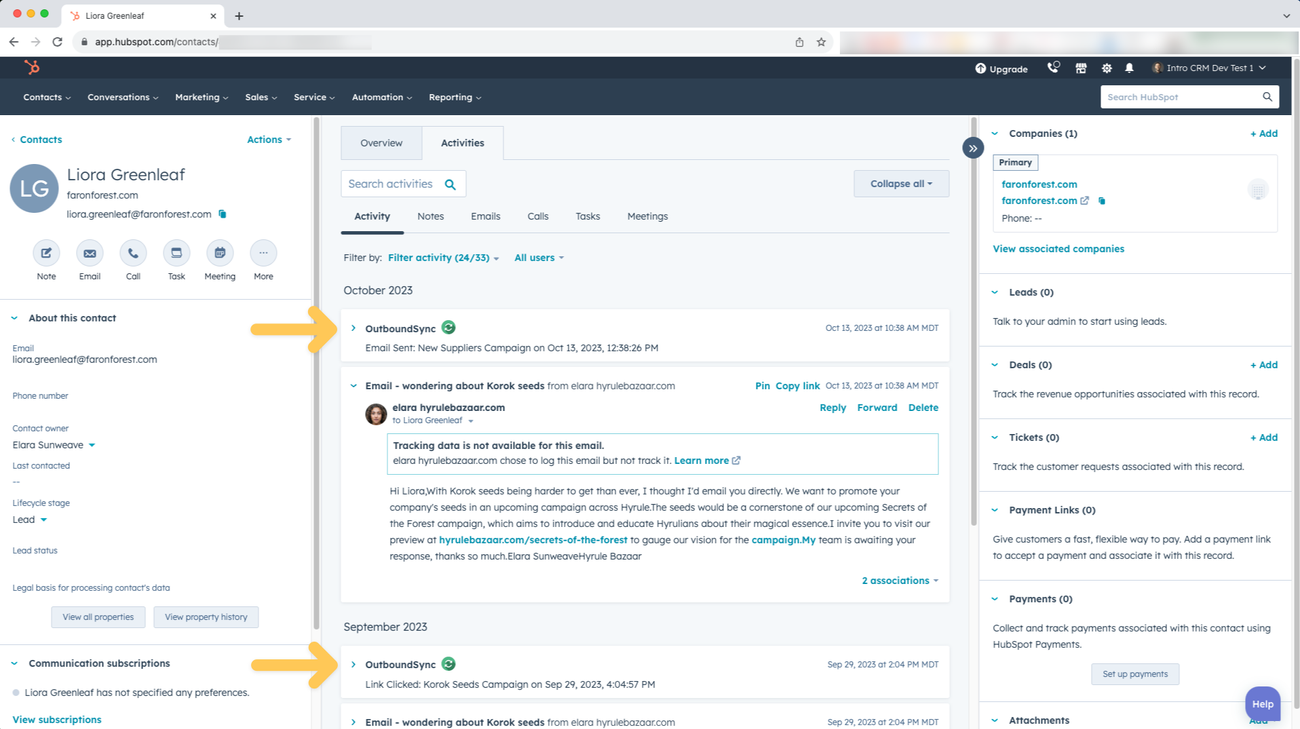
Now that these have been enabled, see what the record looks like, clicking the OutboundSync text and icon to expand the timeline event:
More examples of synced records
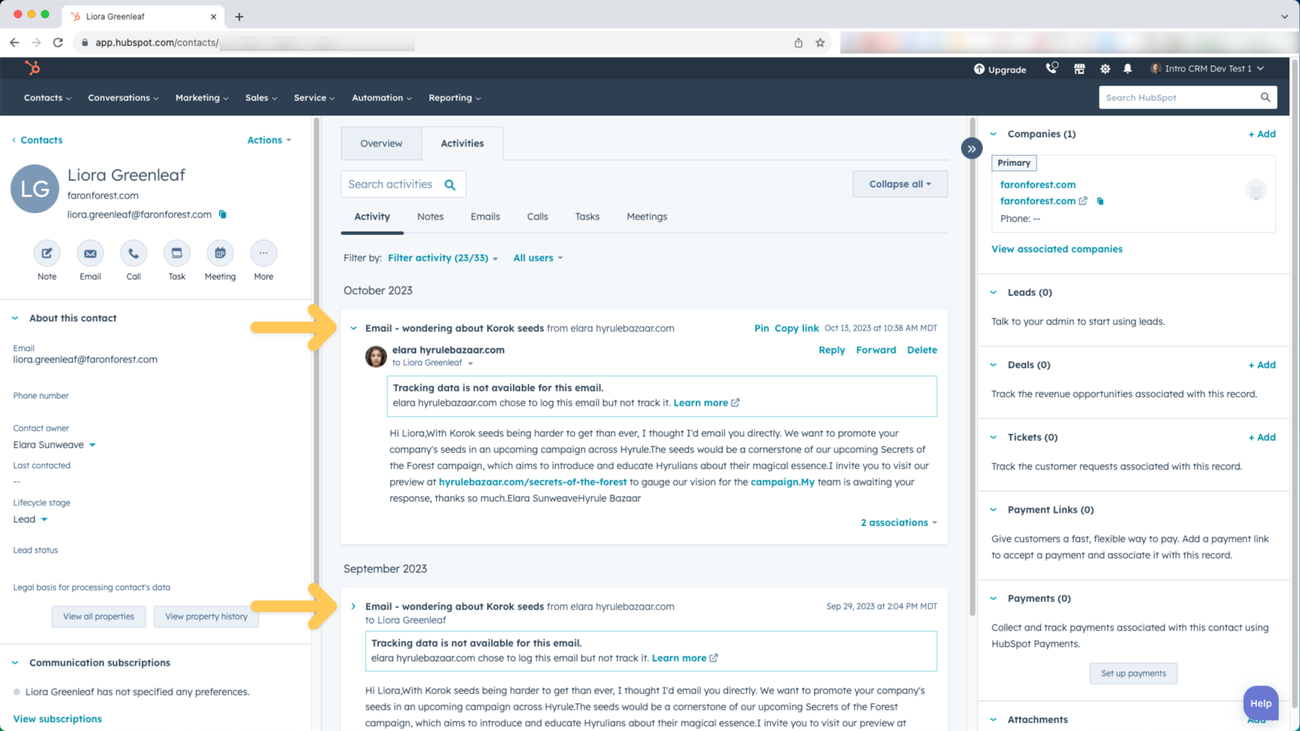
Section titled “More examples of synced records”Here’s an example of what synced sent emails and replies should look like in a Contact record when Filter activity is not enabled:
With Filter activity enabled for OutboundSync, it should look like this. Note that you see the OutboundSync logo in the timeline with more details about the events:
You can see what this looks like in the company record by clicking on the company name:
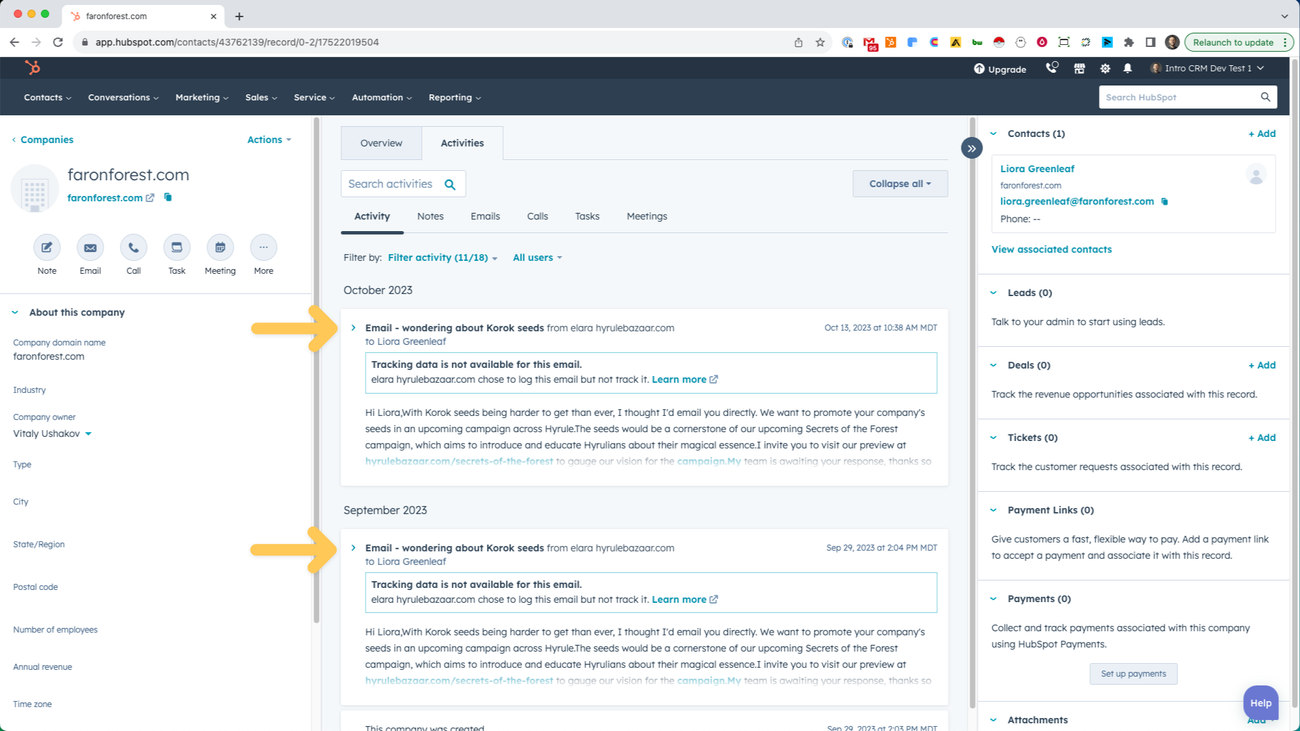
In this case, you can see that OutboundSync is not only associating the company and contact record, it is also associating the emails with both the company and contact records.
Connect Sales Engagement Platform
Section titled “Connect Sales Engagement Platform”To finish the process, add the newly created OutboundSync source URL into your Sales Engagement Platform.
Find instructions on how to do with with the following supported platforms:
If your sales engagement platform also has a built-in HubSpot connector (Instantly, Smartlead, or HeyReach), leave that native integration off when you wire OutboundSync webhooks — running both can duplicate or conflict activity.
Salesforge beta and GetSales beta are also available right now as direct one-way integrations for email and social activity. Dedicated guides are coming later, so use the onboarding steps provided by the OutboundSync team for current setup.
It is vital that you properly add and configure your webhook in your Sales Engagement Platform. If you don’t do this, OutboundSync won’t receive data and your data will not show up in HubSpot.
This guide is the self-serve setup path. For optional guided onboarding on a paid rollout, contact support.
After your first sync
Section titled “After your first sync”Once sources are connected and activity is landing in HubSpot:
- Run a webhook test payload to confirm delivery end to end.
- Install pre-built Supered packages for starter dashboards, workflows, and lists (choose omnichannel, email, or social to match what you sync).
- Wire CRM-driven block and exclusion lists — update block lists from HubSpot lists, then use the block list maintenance guide for day-to-day ops.
- Build reporting and lead scoring from the HubSpot reporting hub — contact properties, timeline events, and engagement records. For open/click count follow-ups, see Trigger workflows on email engagement thresholds.
- Use Identifying OutboundSync data in HubSpot when you need to tell HubSpot native/offline Record source apart from which sales engagement platform (Instantly, Smartlead, HeyReach, and others) produced the synced activity.
Related guides
Section titled “Related guides”- How do I decide which data to sync?
- How category-based filters work
- How to fetch lead categories or statuses
- Prevent HubSpot duplicates from OutboundSync
- Agency and consultant access handoff
- Lookup method options for social sync
- Handling social profile URLs for matching
- Single Page Setup Guide For Outboundsync S Salesforce Integration